Thursday, January 7, 2016

Judy's Orange Chicken- Gave to the Crave

Craving no more--Judy's Orange Chicken

For a few weeks now I have been craving orange chicken.  Finally I gave in to the crave & made orange chicken for dinner.   It was so wonderful so of course I had to share pics, then folks started wanting my recipe.   Luckily it had not been too long a time span and I was able to write it down and decided to share it here & pin.  One person has already made the recipe and as they said..."too delicious!!"  

Judy's Orange Chicken-

Marinade-
meyer lemon juice (juice of 2-3 lemons)
salt
2 tsp tumeric
3 tsp red pepper flakes.
Place in a ziplock with chicken and mix till well coated, let sit in fridge an hour or 2....then let set at room temp about 30 min b4 cooking.

Ingred--

Veggies-
2 julienne carrots
½ red pepper julienne
½ orange pepper julienne
3 green onions chopped (whites & greens)
hand full of snow peas
cilantro

Sauce-
1 ½ cup chicken stock (½ cup aside to deglaze)
1/3 c. orange marmalade
1-2 heaping tsp chopped garlic
1-2 tsp. Chili pepper paste (or flakes) more or less for heat preference.
½ tsp grated ginger
2 Tbsp. soy sauce
1 tsp. fish sauce
several shakes rice vinegar
2/tbsp. Corn starch

Mix together all sauce ingredients (except ½ cup of the chicken stock) and sit both aside

In dutch oven or large skillet....on med heat cook the chicken till just barely done( I use tenderloins and cook about 4 min on each side) remove from pan.

Turning the heat up on med high Pour in ½ cup chicken stock to deglaze the pan...add in carrots and let those cook for about 1-2 min then add in peppers and cook a couple more minutes, add snow peas & ½ the chopped onion & rest of the sauce mix and stir well then add the chicken back into the pot turn the heat down low stir go coat the chicken, cover & let cook on low about 6-8 min for sauce to set.

Serve over cooked rice top with chopped green onion & cilantro.  


Monday, June 3, 2013

My Idea of March Madness

I love making homemade corned beef.   This year I took it a step further than I had in the past....   It was so very rewarding that I think this will be a March ritual now.   My March dinner party consisted of Homemade corned beef, homemade Kraut, homemade marble rye & home made thousand island dressing... It was a fabulous meal!

Making corned beef requires more time (inactive time) than talent or active time...just need to plan ahead...   Here is my recipe that is a definite keeper!


 Ingredients

  • 2 quarts water
  • 1 cup kosher salt
  • 1/2 cup brown sugar
  • 2 tablespoons saltpeter
  • 1 cinnamon stick, broken into several pieces
  • 1 teaspoon mustard seeds
  • 1 teaspoon black peppercorns
  • 12 whole cloves
  • 12 whole allspice berries
  • 16 whole juniper berries
  • 2 bay leaves, crumbled
  • 1/2 teaspoon ground ginger
  • 2 pounds ice
  • 1 (4 to 5 pound) beef brisket, trimmed
Directions-

Place the water into large 6 to 8 quart stockpot along with salt, sugar, saltpeter, cinnamon stick, mustard seeds, peppercorns, cloves, allspice, juniper berries, bay leaves and ginger.  Cook over high heat until the salt and sugar have dissolved.

Remove from the heat let cool to room temp & add the ice. Stir until the ice has melted.
If necessary, place the brine into the refrigerator until it reaches a temperature of 45 degrees F. 

Once it has cooled, place the brisket in a 2-gallon zip top bag and add the brine.
 Seal & lay flat inside a container, cover and place in the refrigerator for 10 days. Check daily to make sure the beef is completely submerged and stir the brine.

After 10-14 days, remove from the brine and rinse well under cool water.

Place the brisket into a pot just large pot, add 1 onion 1 tsp clove, 1 tsp allspice 1 tsp juniper berries with water by 1-inch. Set over high heat and bring to a boil. Reduce the heat to low, cover simmer 2 1/2-3 hours til the meat is fork tender. Remove & slice thinly across grain.


To make hash…  cube potatoes and fry till almost done, add onion &  chunks of  cooked corned beef & cook till good browning and crispy edges on some of the meat & potatoes…  serve topped with poached egg & lime juice over egg & hash.

Enjoy!


Monday, February 13, 2012

Kefir Water to Ginger Beer

My last trip to World Market ended with a 6 pack of Ginger Beer in my shopping bag...(non alcoholic).    I am not a beer drinker, I do not like beer, I am a wine or whiskey woman if I drink.    I was introduced to ginger beer this last year.  Since it was a soda and not really what I think of as beer I gave it a try.   I loved the flavor, nice full flavor that did not exist in ginger ale which I also dont care for.  

Now that I am a Pinterest user, I find that there is a recipe for EVERYTHING...so I go on the search in Pinterest, I Google ginger beer recipes and scan, read & review a number of web pages.   The search gave me many options to review, I researched, the process and the tools needed.    That led to another search & research on Kefir grains, something I had never heard of before but found to be quite interesting.   That interest set me on a mission to make my own Ginger beer, to have the experience of the process, learn something new and of course the health benefits of the kefir made this a MUST DO on my list.  

I ordered my grains, gathered my tools, and started on my latest project  Ginger Beer...

Tools needed: 
To begin, place your new kefir grains in the strainer and rinse well with some filtered water
Put sugar in quart jar, with raisins & Kefir grains.  
Add the 4 cups of water and cover with cheese cloth held in place with the rubber band. 
Put the jar on the counter out of direct sun and let sit for 1-2 days.

  
 If your water is fridge cold, then it will take about 2 1/2 days. You will know the water is ready to drink or bottle & ferment when the raisins have raised to the top of the jar.
You will notice my jar is only 1/2 full, not knowing what to expect, I only used 2 cups of water on my first batch.


3 days later (my water was fridge cold) the rasins were floating, now it is time to Bottle! 


Bottling Tools:
Plastic mesh strainer
Plastic funnel
Bottles (plastic or glass with tight lids)
Cheese cloth
sliced, grated or chopped ginger (about 1/2 tablespoon is what I have used so far).
(not distilled) I use a Brita pitcher

Strain the kefir water through the plastic strainer.    You can strain thru the mesh lined with cheese cloth 3-4 times and your water will be clearer with each straining. 
Place your funnel in the bottle, set the strainer in the funnel and pour your water into the bottle(s).
Add ginger pieces or any other fruit flavor you want in your water.
 If you want a sweeter water you can add about 1/2 -1 tsp. blackstrap molasses will also give a fuller flavor.  Place the lid on the bottle.


At this point, If you want Ginger Beer, or a different flavor carbonated drink, place the bottled water in a box or are in the home that is room temp and no direct sun.   Let sit 3-5 days to ferment and develop flavor.  Place in a room temp for 3-5 days to ferment.  You might want to loosen the lid and release pressure then tighten back up once each day to avoid too much pressure build up.  During this fermentation, the liquid will becom fizzy.   After fermentation, place the sealed bottles in the fridge for storage, up to 3-4 weeks.

If you do not want a carbonated drink, you can drink the water now or add ginger, or a fruit of your choice and let it sit in the fridge for a couple of days to flavor.    Then enjoy.


My first glass of homemade ginger beer, in this picture with the glass you can see the fizzy bubles.

I like the taste of this water, with or without the carbonation....not to mention all the health benefit I have read about. This is a great project for many reasons and I this will be an on going process in my home.

The photo below is batch 2, you can see how the raisins work their way up the jar.
This is a full 4 cup batch.

Tuesday, December 27, 2011

Tomato-Basil Salad

While scrolling through pintrist this evening I ran across a salad someone had posted and remembered I love caprese and eat them 3 seasons, they are easy, tasty & pretty.  This post is about one in particular that I have only made once, but will for sure do again as it was very unique to the eye and taste.
  
I was planning a dinner for girlfriends, on a warm late summer day.   I love making tomato, mozzarella, basil (caprese) salads.    So I went shopping, making a stop at a new Trader Joe's in KC,  I wandered through the produce section looking for the tomato piles.    There to my amazement was a bin of brown tomatoes.   I have never heard of them before, so naturally I had to pick up a package.  The looked very different, I would say more of a dark green than brown.  I was just too curious about the taste and I thought they would look very pretty with red & yellow tomatoes in the salad. 


 I was very excited to cut them open and what a difference there was on the inside.... not very appealing actually, but would still provide great color for the salad and the size was perfect to be put together with the red & yellow tomatoes I had purchased.  I withheld judgement still till the end...

I made the salad using red tomato, yellow tomato, brown tomato, LOTS of fresh basil that I had clipped fresh that day.   Sprinkled with capers & Kosher salt then drizzled with grapefruit balsamic & blood orange olive oil.       The flavor of the brown tomato is even milder than the yellow, almost bland, however with mixed in the salad it was a nice mix.

The result was very very tasty & nothing short of beautiful..so I had to share here.

Plain Ole Vanilla

1 1/2 years ago I retired.  Since that time, I have ventured into several new projects in my kitchen.   Having much time on my hands, I have been baking significantly more over this last year.    With that my vanilla supply is quickly dwindling.   For years I have had family members that would spend their winters in South Texas and with those annual trips, they also became my vanilla supplier.  This last year, however; my mother forgot the vanilla and now I find myself at risk of having to buy a tiny bottle from the local grocer for big bucks as opposed to the larger quantity of that coming from the trips to Mexico.    Considering my situation I was faced with 4 options.  1) hope mom did not forget me this year.  2) take a trip from Kansas City to Mexico myself to purchase my vanilla. 3) buy vanilla extract from the grocery store.  4) make my own. 

I quickly ruled out options 1-3 and decided now was the time for me to another learning project.  I should be able to go about 3 months with my current supply, so time was on my side to begin this endeavor.   My latest project is making my own vanilla extract.   

I begin with lots of research, the Internet is such a wonderful tool for the DIY person.   You have the opinion of hundreds all at the tip of your fingers.   You can read, compare, confirm the good, bad & ugly experiences of others both novice & experts.   

I discovered this process requires not any vanilla bean, but "extract" grade beans, or grade B beans.    The ugly ones, not the premium beans.  Funny one of the most used and favored nectars is made up of an uglier line of pod.   Found the right price for quantity on Amazon & placed my order.  

I wanted my vanilla to be plenty rich and in my research the recipes were anywhere from 3-8 beans per cup of liquid(vodka).   My vanilla, must be a stronger flavor, so I put in 10 beans per cup.

Such a simple process...
Dark sterilized bottle with tight fitting lid  (a dark wine bottle is a good option) this will be the steep bottle
grade B extract grade vanilla beans
70-80 proof vodka (any brand...but all research advised that 70-80 proof is better than the higher proof vodka).
smaller 1 - 1 1/2 cup dark bottle steralised(like a beer bottle with swing lid) this will be your using bottle

Place the beans in the steeping bottle, fill with vodka & tighten lid.
Place the bottle in a cool dark room, or closet.    For the first week shake a few minutes each day, then every few days give the bottle a shake.  After about a month, just shake the bottle about once a week.  

Your vanilla will be ready to use after about 2-3 months, however if you can let it sit up to 6 months will give your a better product.

Once you are ready to use your vanilla---
 cover the opening of the steeping bottle with cheese cloth
pour through a funnel to fill your using bottle with vanilla.   This will keep sediment out of the vanilla you will be using to bake, and will also keep the vanilla in the steeping bottle.  
Take more vodka and top off the steeping bottle return to dark corner to steep till ready to refill your using bottle.   

You can top of the steeping bottle for years to come.   If down the road(years) you feel your vanilla needs more strength then you can purchase more beans to add to the steep bottlem byt according to my research findings, you can use off the same bottle for as many as 30 years by just topping off the vodka.    I started my vanilla in a clear jar so I could see the process for the first week, then I changed it over to a wine bottle that will be my steeping bottle.    I am just now almost 1 month into the process so it will be a bit longer b4 I will know if I have the product I am expecting.    I now sit anxiously and wait, but I do have the pics posted below of the first few days.   

This is an easy project, and I find now that I have more time I truly enjoy making as much as I can from scratch instead of buying pre processed, this will make great gifts and it is always a good feeling to give or use something that I have created.

day 2


Day 4

Tuesday, March 22, 2011

The Table

Things had settled somewhat since my retirement,  I had taken time to do absolutely nothing and I was now  ready to move on into some home projects.  First on the agenda was the new dining room set. 

It started November 29, 2010.  I had just come home from a wonderful Thanksgiving holiday with the family in Mtn. Grove & Springfield.  I love being retired, my holidays can now all be 2 week events and I am not worried about wasting "vacation" time.

My old set was just that...OLD.   I purchased the table at a garage sale about 15-16 years ago.  Even then it was quite old, easily identified by the design to be a circa 1972-74.   Butcher block top, with square metal legs in a pea green.  The chairs were metal also in the pea green with back & seats in the same shade of corduroy.    But it was in good shape and I could not pass on the $15.00 sticker.  I got rid of the chairs and found 4 bistro style chairs for $4.00, purchased some pretty upholstery fabric for the seats, grabbed the paint brush and ended up with a pretty little yellow dinette set.   Even up to Nov. 2010 it was very nice looking and not dated.  

   I spent a couple of months shopping online for styles and prices.  I looked at inventories from all major retailers as well as the online only retailers.   I found THE set, and the best price for the item was from an online retailer.   The day came that it was time to order the set.   November 29,1010, I place the order by phone as I had questions about their delivery process.   That ended up being a good decision the order rep gave me a bit of a discount.   The original delivery date was to be 12/13.    3 days later I get an email advising the ship date  had been pushed out to ship by 1-7-2011.   I was ok with this change, I had no plans to entertain at my home over Christmas.     1-7-2011 came & went and no calls or correspondence about the delivery, so I called the retailer and was advised the item had shipped on 1-7-2011.   Delivered 1-13-2011, 4 pretty large boxes carried up to my dining room.   I open the boxes and let them sit for 1 1/2 days to acclimate to the house temp.  Seems I had heard that should be done with wooden items.    Then the next 2 days I spent piecing together the 4 chairs.  This was a painful process since the tool used was a tiny allen wrench.   That can be very hard on the fingers when trying to make sure you have everything tightened.    I had torn down the boxes that held 2 chairs, the table and the pedestal and put them all in the remaining chair box, I needed the room and had the chairs all together now so wanted to start getting rid of unnecessary items.   To assemble the table I had called in help from friends that had the strength to make sure the table was together and sturdy.....then began the ordeal.    The pedestal was fine, however, the 4 legs coming off it all had some very seriously big cracks and would not hold up at all over time. 

Bad legs


So I contact the retailer the next morning and tell them of the situation.  They respond quickly with a couple of options.  1.  Receive a 30% credit and I can go have the item repaired  2.  Return the item for full refund.  3.   Return & have replaced.     I asked if they could send only the legs, after all the pedestal & legs were in their own box, so I was happy to just have a new pedestal & legs.    

As requested the retailer sent a new set of pedestal & legs only, the delivery for set 2 was 2 weeks later.   Well what are the odds....these too had cracks, 3 of the 4 legs were cracked.     Not as badly cracked as the first set but I was still in the same situation.   I again contacted the retailer, and again they were very quick to respond and advised they would be sending a 3rd set of legs, we are now at mid February.   The retailer also said they would advise the shipper to be more careful.   Now more than a month from initial delivery, I still do not have a table, I was ready to ship the whole set back and get a full refund, however, I had already cut up the boxes and now I was going to have to find boxes large enough for a table & chairs.   I had notified the retailer that the problem was with the construction, not the delivery company, and they were sending a 3rd set of legs.  

Stress began to set in to the point I was losing sleep one Friday night.   Then I decided I would contact the retailer Monday morning and if the 30% refund was still on the table I would take it.  I needed something moved along and closed.   Sunday I get a call from a great friend asking if they needed to come help me with the table, to box for refund, I told them I had decided I was just taking the refund and would do what I needed for the table.   We visited a bit, I hung up the phone, got on my computer to check my email.  There in my inbox an answer to prayer.  An email from the retailer.  This email contained an offer, instead of 30% credit, they offered me 40% credit & the 3rd set of legs.   I quickly responded with "I'll take it".  The 3rd set came, again, only 1 leg had no splits.  In the end out of 12 legs, I was able to get 2 with no splits at all and 2 with just very small splits.  Things were surely looking up.  What sweet relief, this was now a closed issue with the retailer & I could now move on to getting a table, whether it be a repair on what I had or to start hitting the 2n hand stores for one to paint/stain and I received a larger credit than anticipated.  

During all this process, I spent a lot of time contemplating what I could do to get a table in my dining room.... my mind kept saying If I only had someone that could weld a strip around each leg to brace it...  OH wait...I do know a welder, so I get on the phone and make the call.   3 weeks later, I HAVE A TABLE!    No, I don't just have a table I have a beautiful CUSTOM table.  


The black band around the leg where it joins the pedestal is the beautiful fix.

I made sure that during the process I would not be impatient, short or rude in any way to the retailer.  I tried to always be gracious and grateful to the retailer in all the dealings.    Grant it, I was stressed, and it was tiring to have projects "put on hold" and was not a FUN time; however, the end product is much stronger and sturdier than the original, I absolutely love the looks of the table after the fix.   It is much more finished looking  and of course now I have a one of a kind table.  The retailer was quick to apply the credit, and the 40% was given off the list price.  

Patience is hard on us at times for sure, but I consider this whole episode a gift from God.   It is rewarding to go through the stress knowing I remained peaceful in dealings and now have the blessing of a higher quality end product at a much lower cost.   With this handled, I was able to move on and complete the rest of my furniture purchases.   

Today I sit here and see a dining room I want to spend time in now.  I am thankful and hoping that I will always see all day to day life happenings as a gift.
We cant always control what happens to us, but we can control how we deal with life and how we deal does definitely affect our life and relationships.
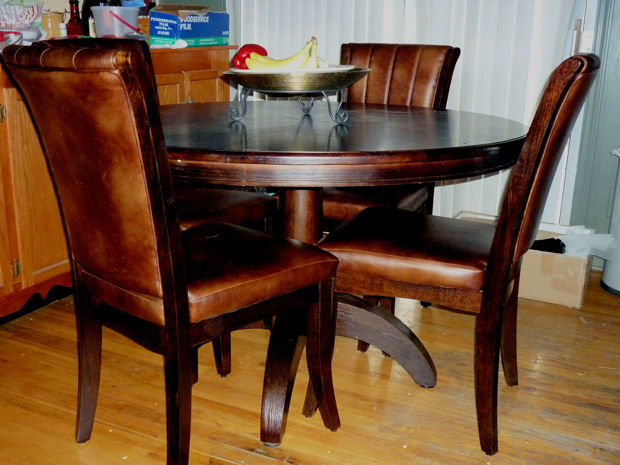
The set
 

Tuesday, February 8, 2011

I am back

Well it has been a bit since I last posted.   Since I am new to this, not sure how much I will actually write.  The last couple of weeks have been hectic..and very cold & snowy.  Over the last 3 weeks, we have had 3 very large snow storms here.  The smallest amount of snow received at my home was the first snow which was right around 6 inches of snow.  Snow 2 came in at 8 inches here at my house and snow 3 came in 9-10 inches.   Snows 1 & 2 were very dry, and going out the next morning to clean the drive was not too bad, they were sunny days, no wind, so it was a pretty venture in not totally miserable conditions.   Not that I like shoveling snow, but I hate worse to be in a position of being snowed in.   I can usually do a pretty good cleaning of my drive in 30 minutes or a little less.   Snow 2 took the full 30 and because there was still snow piled on the sides from snow 1, I did not do the whole width of the drive.   But I cleared it so that the sun would hit the concrete and melt any bits I left behind.   I figure I am to clear most so nature can do it's job and completely clean the whole drive.   However it has been so cold that here we are a week after snow 3 and there is still snow piled along the drive and my yard is covered in several inches of snow.    Needless to say we have had cold temps and little sun.  

Snow 3 was Tuesday February 1, the BLIZZARD of 2011, one of the largest (geographically) blizzards in something like 30  years.  From north Tx all across the midwest up to the NE seaboard.  This day is also an even greater day, to me anyway.  February 1, my birthday.  The day my folks were blessed, I say loosely, with a daughter.  The day I was truly blessed by being born to a set of parents I would not trade for the world.   Life is good, bad & ugly, but it is such a wonderful experience when you have parents, grandparents extended family that is as great as what I have been given.  I can never express enough gratitude to God and my family, all of them, Parents, Grands,siblings, in laws, steps, Aunts, Uncles, cousins, every single one.    I truly love them all more than I can fathom.    Because of this I can sit at home, THANK YOU LORD for retirement...doing nothing at all but having coffee, watching tv & watching the beautiful snow fall (Blizzard 2011) on my birthday and not be bummed that I am not out doing something to celebrate.    Besides, Life in itself is a celebration, all the little things in every day are a gift, and when life tosses out a dirty hard, ball of ice, there is still a gift hidden in there when we let God catch it for us.

I have been asked about my table saga, and it is still going on.  Steps have been made, but I will give the full story once I am able to sit at my table and post the info.    But that story is evidence of the hidden gifts from God.

Next on the agenda,  Taxes and dental work.   I know, more fun than one can ask for huh.    But everything is a gift in some way. 

This week, pretty low key,  I will be cooking a corn beef that I corned...fun experiment.  I also have to make lasagna for a lunch on Sunday.   I will also likely be watching more snow fall this afternoon as another wave of snow is predicted.   It is so beautiful, especially when viewed from the warmth of your home.

Til next time...